What is a plumbing vent?
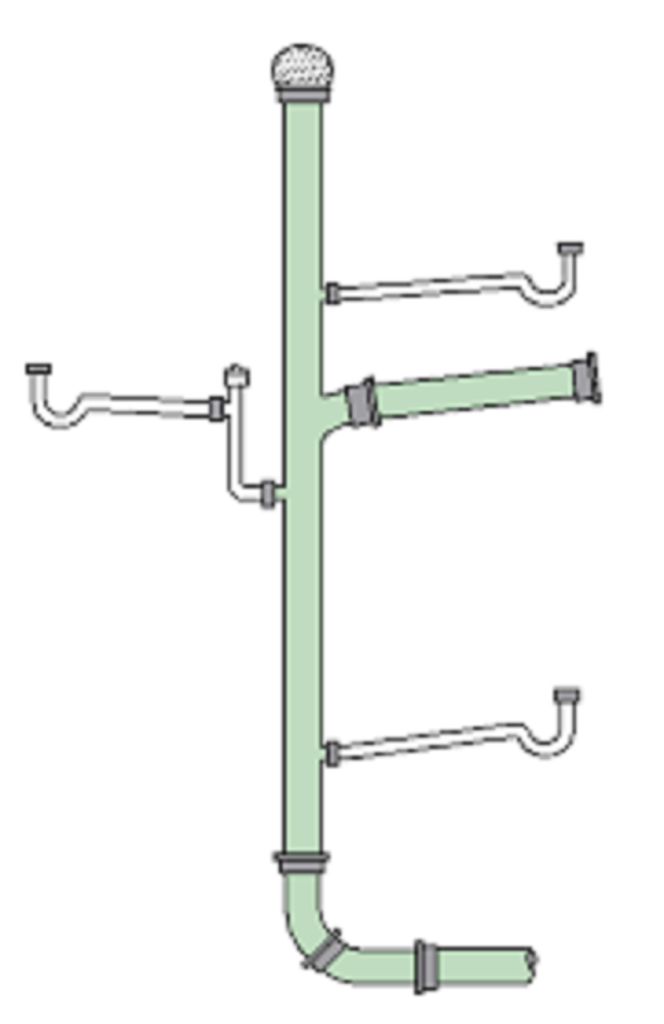
A plumbing vent is part of a building’s drain-waste-vent system. It is typically a vertical pipe that extends from the building’s drains to the roof. A plumbing vent is a type of ventilation system that helps to remove sewage gas and other smells from the home.
The purpose of a plumbing vent is to allow air to enter the building’s drains (to equalize the pressure) and to allow waste gases to escape. Plumbing vents are important for both indoor air quality and public health. In addition to removing sewage gas, they also help to prevent sewer line backups and slow drainage. Without a vent, the building’s drains would be unable to function properly.
The following article will provide a complete guide on how you can deal with any clogging issues in your plumbing vents. It explains in a step-by-step way how to unclog plumbing vent without getting on roof.
Purpose of a plumbing vent on Roof
The purpose of a plumbing vent on a roof is to provide ventilation for the sewage line system in a building. The sewage line system relies on a vacuum to function properly, and this vacuum can be disrupted if drains or toilets are not vented. By venting the sewage line system, air from the roof can be used to replace the atmospheric air that is being used by the sewage line system. It also helps to maintain the vacuum and keep the sewage line system functioning properly.
In addition, it helps to prevent odors from being emitted from the sewage line system. The purpose of a plumbing vent on a roof is to allow air into the drainage system and to prevent negative pressure from building up in the pipelines. Without a proper vent, the water in the drains could be forced back up through the fixtures and cause sewage backups or flooding. In addition, the vents help to keep the drains clear by allowing any fumes or odors to escape. As a result, plumbing vents play an essential role in protecting both property and public health.
Reasons for the clog in plumbing vents

Plumbing vents are a crucial component of any home’s plumbing system, allowing air to flow through the pipes and preventing clogs. However, sometimes these vents can become clogged, leading to various plumbing problems. There are several reasons why plumbing vents can become clogged.
One of the most common reasons for clogs in plumbing vents is the accumulation of debris, such as leaves, twigs, and dirt. This can occur when vents are located near trees or other foliage. Another reason for clogs in plumbing vents is the buildup of ice in colder climates, which can restrict air flow through the pipes.
Additionally, the improper installation of plumbing vents can also lead to clogs. If the vents are not positioned correctly or are too small, it can cause air to become trapped in the pipes, leading to clogs and other plumbing issues.
Regular maintenance and cleaning of plumbing vents can help prevent clogs from occurring. This includes removing debris or ice buildup and ensuring the vents are properly installed and functioning. Overall, keeping plumbing vents clear and free from obstruction is essential for maintaining a healthy and functional system.
If your vent is clogged, you may be experiencing long-term ventilation problems. Clogging can lead to an increase in indoor air pollution and even plumbing issues like leaking pipes or overflowing dumpsters.
One common cause is the accumulation of lint and dust, which can restrict airflow and eventually lead to a blockage. Another possibility is that animals or birds may have made nests in the vents, which can also block the flow of air. In some cases, tree roots may have grown into the vents, causing a partial or complete obstruction. Whatever the cause, it is important to clear any blockages as soon as possible to avoid any damage to the plumbing system.
Read More: A Comprehensive Guide About How Much Does A Cost Of Gas Fireplace?
8 Steps implement to unclog plumbing vent without getting on roof
Step 1
The first step in unclogging is plumbing vent identification. You may not be able to see the top of the vent pipe from the ground level, but you can usually get a good idea of its location and extent by recognizing the line of the pipe running up the side of the house. Once you’ve located the pipe, you can begin unclogging it from the top. Clear any blockages in the pipes with a plunger or drain snake. If necessary, you can also use a power washer to remove any stubborn debris. With just a little bit of work, you can clear up the blockage and get back on track with proper drainage in your home.
Step 2
After following the first step, in the second step, climb the attic and check that the plumbing vent pipe is closer to the building wall. If you didn’t find it easily, go to the roof to unclog it. First, find the location of the vent pipe on the roof. It should be close to the highest point of the roof. Once you’ve located the pipe, use a plunger to try and unclog it. If all techniques fails, you may need to use a snake or other tool.
Step 3
Here is the third step, to unclog your plumbing vent without having to get on your roof is to use a hacksaw. Carefully remove the portion of the vent that is clogged. Be sure to be meticulous in your work, as any cracks or damage could lead to further issues down the road.
Once you have removed the clogged portion, you should then be able to flush your system with water to remove any remaining debris. In some cases, it may be necessary to repeat this process several times before the issue is completely resolved.
Step 4
Here is the fourth step. If you have a small hole in your plumbing vent, you can use an auger cable to unclog it without getting on the roof. First, attach the auger cable to a plumbing snake. Then, insert the auger cable into the small hole in the vent. Begin to slowly turn the auger cable clockwise as you feed it into the vent.
Continue turning and feeding the auger cable until it comes out the other side of the vent. Once the auger cable has cleared the small hole, remove it from the vent and allow any water that has accumulated in the vent to drain out. Finally, make sure the plumbing is clear of any debris created by auger cable by flushing it with clean water.
Step 5
In the fifth step, measure the hole to open the vent pipe. You’ll need a saw or a drill to make the hole. Prepare the materials you’ll need to unclog the pipe. You’ll need a snake or a wire brush. Finally, measure the pipe’s diameter and insert the snake or wire brush into the pipe.
Step 6
Burrs are the most common cause of vent blockages, so if you find some on your inspection trip don’t panic. So in the sixth step, you have to remove burrs from the vent before you can unclog the vent. The best way to remove burrs is to use a knife blade. Simply insert the blade into the burr and twist it until the burr comes loose. Once the burr is loose, you can then scrape the ends off with your knife.
Step 7
In the next step, you can apply PVC adhesive to the open ends of the pipe. Check your measurements against those of the PVC coupler. Make sure it’s a perfect fit. Apply PVC adhesive to the coupler also and then attach it to the pipe. Check that all of the pipes are flush with each other and there aren’t any gaps between them.
Step 8
In the eighth step, place the coupler over the hole, then screw the eye hook into the coupler. Next, attach one end of the cable to the eye hook and feed it down through the vent pipe. Then tie any kind of weight to the cable when it reaches the pipe’s bottom. Finally, pull the weighted cable back up through the pipe, clearing any debris as you go.
Final Words
This guide unfolds the different steps of unclog plumbing vent without getting on roof. If you are having trouble unclogging your plumbing vent, there are a few methods you can try before getting on the roof. Hopefully one of these methods will help clear the clog and get your ventilation system up and running again. While these steps may take a little extra effort, they are definitely worth it in order to avoid potential accidents or injuries.


